
What this helps you do
Add questions to a Form, choose how each answer is collected, and arrange the questions in the order people will see them.
Before you begin
For the complete workflow, you need Full Admin access.
A Limited Admin needs these Forms permissions:
- View to open Forms and the Form builder.
- Create to add fields.
- Edit to change or reorder fields.
- Delete to remove fields.
Team Leaders cannot open the Forms area or its field-management routes.
Open an existing Form before you begin. The Form builder automatically includes the contact fields selected in the Form’s settings; the fields you add appear after those contact fields.
Steps
Add a field
- In the admin navigation, select Forms.
- Open the Form you want to build.
- Select Add Field.
- Choose a field type.
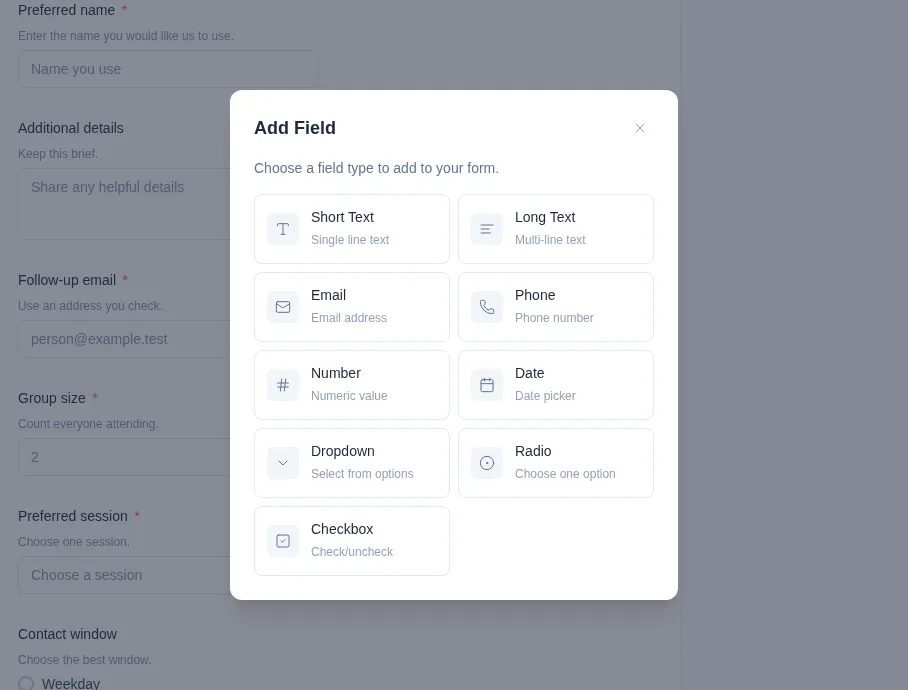
Engage Spot adds the field to the bottom of the Form and opens its Editor.
Choose the field type
| Field type | What people enter or choose | Important behavior |
|---|---|---|
| Short Text | One line of text | Supports placeholder text and the browser’s required-field check. |
| Long Text | Multiple lines of text | Supports placeholder text and the browser’s required-field check. |
| An email address | The browser checks that an entered value has an email-address format. | |
| Phone | A telephone number | Opens a telephone-friendly input, but the custom answer is not checked as a valid phone number. |
| Number | A numeric value | The browser accepts numeric input. There are no minimum, maximum, or step settings. |
| Date | A date | Uses the browser’s date picker. Placeholder text is not shown for this field type. |
| Dropdown | One option from a menu | Add one or more options. The placeholder becomes the empty first choice. |
| Radio | One visible option | Add one or more options. People can choose one option. |
| Checkbox | Any number of visible options | Add one or more options. People can choose multiple options. See the required-checkbox warning below. |
Configure the field
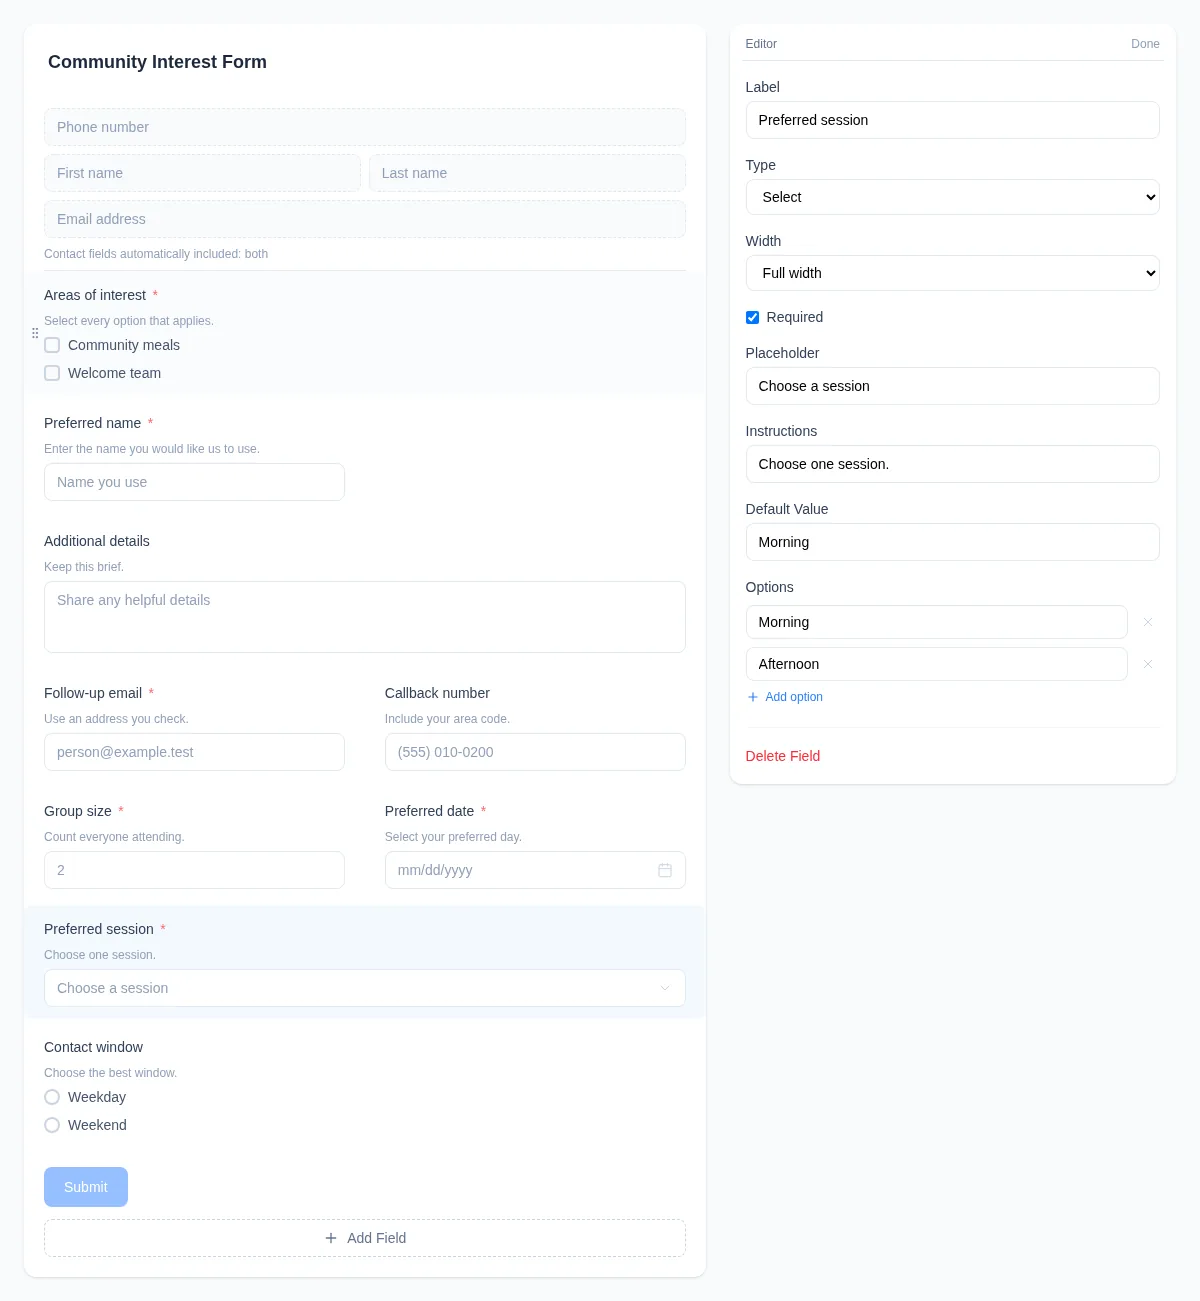
- Select a field in the preview to open its Editor.
- Update the available settings:
- Label is the question or prompt shown above the answer control.
- Type changes how the answer is collected.
- Width makes the field full width or half width. Two adjacent half-width fields share a row on wider screens and remain side by side in the current mobile Form layout.
- Required adds an asterisk and, for most field types, enables the browser’s required-field check.
- Placeholder adds a hint inside Short Text, Long Text, Email, Phone, Number, and Dropdown fields.
- Instructions adds help text below the label.
- Default Value is saved in the builder, but the current public Form does not prefill it.
- For Dropdown, Radio, or Checkbox, select Add option for each choice, enter its label, and use the × beside an option to remove it.
- Wait for the change to appear in the preview before selecting another field. Changes save automatically; there is no Save button in the field editor.
There is no Duplicate Field action. To make a similar field, add another field and configure it separately.
Reorder fields
- Move the pointer over a field in the preview.
- Drag the handle on the field’s left edge to its new position.
- Release the field and confirm that the preview shows the intended order.
The public Form uses the same order. Automatically included contact fields remain at the beginning and cannot be reordered in the field builder.
Check the public Form
- Select View page. The public Form opens in a new tab.
- Confirm each label, instruction, placeholder, option, required asterisk, and field order.
- Check the layout at the screen sizes your audience is likely to use.
Do not submit the Form just to preview its fields. Opening the page and interacting with the controls does not create a submission.
Delete a field
- Select the field in the builder.
- Select Delete Field.
- Confirm Are you sure you want to delete this field?
The field is removed immediately. Existing submissions keep a snapshot of the fields they contained, but the deleted field is no longer available for new responses.
What happens next
The public Form shows your custom fields after its automatically included contact fields. Field order, labels, instructions, placeholders, options, widths, and required markers update as you edit the builder.
Required-answer checks currently run in the visitor’s browser for Short Text, Long Text, Email, Phone, Number, Date, Dropdown, and Radio fields. The server does not independently reject a submission when a required custom answer is missing, so review important responses after they arrive.
Troubleshooting
A required Checkbox can be left unanswered
The current builder shows the required asterisk for a Checkbox, but the public checkbox inputs do not enforce Required, and the server does not reject the missing answer. If one answer is essential, use a required Radio or Dropdown field instead.
A Default Value does not appear on the public Form
Default Value is saved in the field editor but is not currently applied to public Form controls. Use a placeholder or instructions when you need to give people an example.
A field is not saving
Wait briefly after the last change and confirm that the preview updates before opening another field or leaving the page. If the preview does not update, reload the builder and try the change again.
Options are missing
Only Dropdown, Radio, and Checkbox fields show Options. Open the field, confirm its Type, and add at least one option.
A field action is unavailable
Ask a Full Admin to check your Forms permissions. Limited Admin permissions are separate for View, Create, Edit, and Delete. Team Leaders cannot manage Forms.